In today’s cloud-driven world, logging and diagnostics are crucial for monitoring, securing, and optimizing your Azure environment. However, ensuring that all your resources are consistently logging as required can be challenging—especially in complex enterprise setups. This is where Microsoft Azure Policy comes into play, providing an automated, scalable way to validate logging configurations across your Azure investments.
In this blog post, we’ll explore how to leverage Azure Policy to validate and enforce logging across your Azure resources, ensuring that you meet both your security requirements and compliance obligations.
Why Logging Validation is Essential
Before we dive into Azure Policy, let’s quickly review why logging is so important:
- Security Monitoring: Logging helps detect suspicious activities, unauthorized access, or potential breaches.
- Compliance: Many regulatory frameworks (like NIST, GDPR, HIPAA) require continuous logging of activities for audits.
- Troubleshooting: Diagnostic logs are essential for identifying and resolving performance issues in your applications and infrastructure.
- Cost Management: Proper logging allows you to optimize resource usage and reduce cloud costs by identifying inefficiencies.
But how do you ensure all your resources are consistently logging? Manual checks are not sustainable for growing environments. Azure Policy is the solution for automating validation and enforcement.
What is Microsoft Azure Policy?
Azure Policy is a service that enables you to create, assign, and manage policies that enforce rules and effects over your Azure resources. These policies help ensure that resources comply with your organization’s standards and SLAs (Service Level Agreements).
Azure Policy can automatically audit, enforce, or even remediate configurations to align with best practices, such as ensuring diagnostic logging is enabled across your environment.
Key Capabilities of Azure Policy for Logging Validation
- Audit: Detects resources that do not have logging enabled and provides visibility into non-compliance.
- DeployIfNotExists: Automatically deploys diagnostic settings if they are missing.
- Enforce: Ensures that specific configurations, such as logging to a Log Analytics workspace, are applied across all resources.
- Remediate: Automatically applies policy configurations to bring non-compliant resources into compliance.
How to Use Azure Policy for Logging Validation
Let’s walk through the steps to validate and enforce logging using Azure Policy:
Step 1: Navigate to Azure Policy
- Log in to the Azure portal
- Search for “Azure Policy” in the top search bar and open the service.
- From the Azure Policy dashboard, you can view existing policies, assignments, and compliance status.
Step 2: Create or Assign a Built-in Policy for Logging
Azure provides several built-in policies specifically for logging and diagnostics. Some useful built-in policies include:
- Audit Diagnostic Settings: Audits whether diagnostic logs are enabled for specified services (e.g., Virtual Machines, Key Vaults, Storage Accounts).
- Deploy Diagnostic Settings to Log Analytics workspace: Automatically deploys diagnostic settings for resources that do not have them enabled.
To assign a built-in policy:
- In the Azure Policy dashboard, go to Definitions.
- Search for “diagnostic settings” to find relevant policies.
- Click on the desired policy (e.g., “Audit Diagnostic Settings”).
- Click Assign and select the scope (i.e., Subscription or Resource Group) where you want the policy to be applied.
- Configure any parameters, such as the Log Analytics workspace where logs should be sent.
- Click Review + Create to assign the policy.
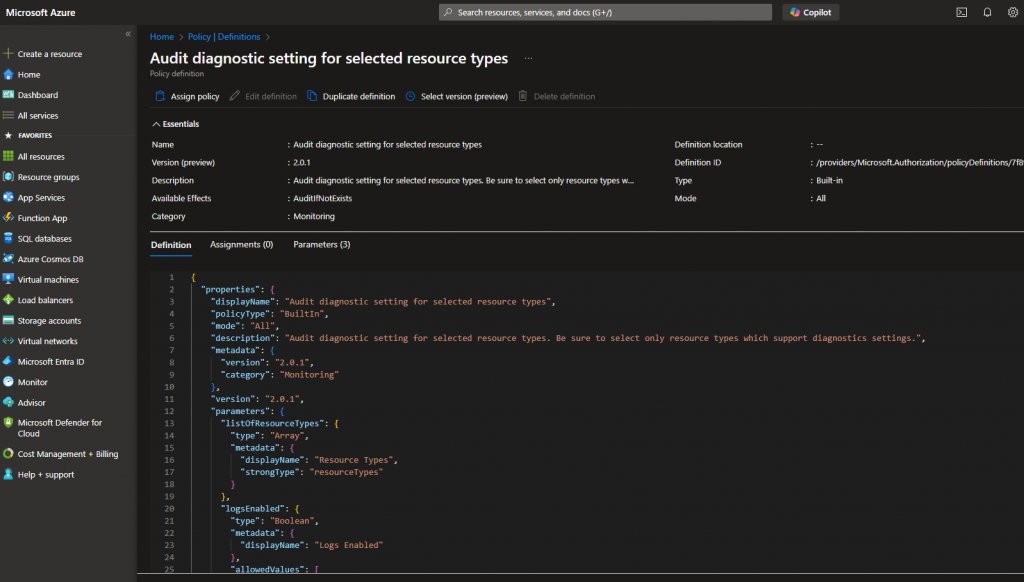
The screen shoot below illustrates the “Audit diagnostic setting for selected resource types

Step 3: Monitor Compliance
Once the policy is assigned, Azure will automatically audit your resources against the defined criteria:
- Navigate to the Compliance section in Azure Policy.
- Review the compliance status of the policy.
- Non-compliant resources will be listed, allowing you to take corrective actions.
Step 4: Remediate Non-Compliant Resources (If Applicable)
If you’ve used a DeployIfNotExists or Remediation policy:
- Click on the non-compliant policy in the Compliance view.
- Select Remediate to automatically deploy diagnostic settings to non-compliant resources.
- Review the remediation tasks to ensure they were applied successfully.
Automate Logging Validation with Continuous Monitoring
For ongoing compliance, consider using Azure Automation Accounts and Logic Apps to automatically trigger audits and remediations periodically. This approach ensures that your logging configurations remain consistent even as your Azure environment evolves.
Best Practices for Using Azure Policy for Logging
- Scope Policies Appropriately: Assign policies at the subscription or resource group level to cover all relevant resources.
- Test Custom Policies: Before deploying a custom policy to production, test it in a non-production environment to avoid unintended consequences.
- Use Policy Initiatives: Group related policies into initiatives to simplify management and streamline compliance tracking.
- Integrate with Alerts: Set up alerts in Azure Monitor to notify your security team if a policy detects non-compliance.
Conclusion: Automate Compliance, Enhance Security
Validating logging configurations with Azure Policy not only helps ensure your organization’s security posture but also simplifies compliance with industry regulations. By automating the enforcement of logging settings, you can achieve greater visibility and control over your Azure resources—without the overhead of manual audits.